First, I’d like to clarify that these were some of the most difficult devices to deal with.
Because of a security called APEX, which appeared at the beginning of Android 9 and 10, you can consider it an alternative to dm-verity.
Its responsibility is greater than dm-verity, which only checked system files to ensure they weren’t modified. Even if you modify them, it acts as if you didn’t see your modification or that you made anything.
The solution is to root. Root modifies the kernel, of course, using a method called System-As-Root.
The problem here was that rooting doesn’t create System-As-Root, which bypasses APEX protection, unless you flash the root zip using TWRP.
And this device doesn’t have TWRP recovery.
I solved this problem by bringing a MediaTek device (at the time, a Realme 3) that had TWRP enabled. I modified its scatter, making the system volume the same as the F9. I modified the kernel size, which is the boot.img file.
I flashed the custom recovery and the root zip file. After that, I extracted the system and boot files. Now, I have a rooted device that I can modify.
That’s a lot of work, right? 😂 But now the situation has been fixed with Magisk, and things are fine. You don’t need all of that. I’ll leave you with the rooted boot files for both devices, using the latest security and version. All you need is that the device you have
must be running Android 10. If it isn’t 10, you can flash it normally without userdata. It will work normally with the data.
The F7 and F9 have FDE (Full Disk Encryption) data encryption, meaning the entire partition is encrypted with a single key.
What’s the benefit of this? The benefit is that as soon as the device boots to the lock screen, all files are decrypted before you even enter your lock screen.
This means that if you can remove the locksettings, you’ve successfully passed. This is the opposite of FBE (File Based Encryption) protection. This means that the files themselves are encrypted, not the partition itself. This encryption is performed in two or three stages during boot. The final stage involves entering the password as soon as the device boots to decrypt your data. Important: The device I have is an F9 with Android 10. We used to modify the kernel to Android 9 to remove the lock.
But in Android 10, they moved the init files to the system itself, so I opened the system and modified the init.rc file.
You’ll look for this line:
For security reasons
Like the image, when you find it, overlay these lines.
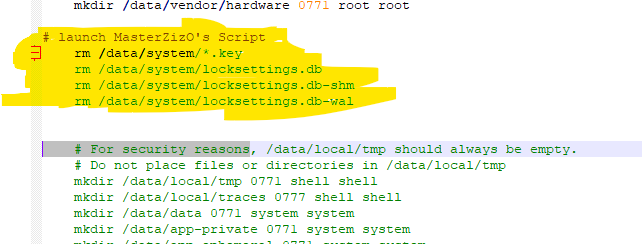
You can use a program like OSFMOUNT, for example. That’s it. All you need to do is flash this modified system with the rooted boot.
Download the rooted boot file here.
Congratulations, your device’s password has been unlocked, even if it’s just letters and numbers, because, as we mentioned, it’s FDE protection.
Don’t forget to restore the system and the original boot afterward so the user can reset the screen lock and operate normally.
And don’t forget to pray for me.